I ripped off about 50" of freezer paper and began breaking it up into smaller chucks by marking wonky lines on the paper side (using pencil and a 24" acrylic ruler). It looked sort of like a big puzzle when I was done...After breaking it into several small chunks, I further broke the chunks down into little pieces.
I cut the chunks apart and made little notes/numberings on each piece so I could re-assemble this mess. I even wrote down what fabric I wanted on each piece....
Then I cut the pieces out and pressed the waxy side to the right side of my fabric (taking care not to waste any fabric).... I cut the pieces 1/4" away from the freezer paper.
And then re-assembled the pieces on the table. Definitely take pictures as you go or you will spend forever trying to figure out how it all fits together.
Then I began sewing the white strips in between the colored pieces. As I picked up a colored piece, I left behind the freezer paper in the right spot so I could put it back together again. You can obviously tell I had some early problems with this step and spent a few hours looking at the hot mess on the table wondering how the shizzle it would all would fit back into the chunk...
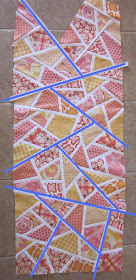
As I got a chunk done, I put it back together to form my quilt top. See the blue lines....those define my "chunks"....It does end up a bit larger than the original piece of freezer paper (each white strips adds an extra 1/2" ). Hmmm....A bit time consuming, but it did turn out OK.
I'll try the improv method this week at the MQG meeting...I think if I use actual scraps it might make the random cutting less painful :-D Happy Quilting!!


wow wow wow. I agree with you - I don't like wasting any piece of fabric. When I made mine I just picked everything I loved and took a chunk from it in the approx size I needed (whether it was scrap or not). I really had very little waste.
ReplyDeleteVery cool, even if it is the "wrong" way to make it!
ReplyDeleteI'm so glad you did this. I loved the one in your previous posts and couldn't figure out how you did it. This is a great help. I can't wait to find time to do it. Thanks for sharing.
ReplyDeleteWell, I can see that I am going to have to 'see it done' before I can figure this one out. Or, I could read the directions...
ReplyDeleteThank you for showing us how you used the freezer paper.It sure made it easy for you to plan out the mosaic very carefuly. I made this block the improv way and I think you might like that approach too. It will be interesting to learn which approach you like better.
ReplyDeleteWow, that is wonderful!! Those colors are beautiful. I love the way that you did this. It looks easier than I thought it would be.
ReplyDeleteI love your "wrong" way to do this - thanks for the tutorial, I want to try this method to make a birthday gift for my sister and this would be perfect!!
ReplyDeleteI don't like the idea of wasting fabric, which is why I use scraps to begin with. I like the look of this, so I think I'll give this a try. Not sure I'll try your method, though - looks terribly complicated, but BEAUTIFUL!
ReplyDelete